Showing posts with label she cooks. Show all posts

Sunday, September 14, 2014

Meal Planning: The Grab and Go Method (lunch)

I am not a great cook. I can cook a few things, but not a lot. I have some family recipes, Pinterest recipes, but baking is more my thing. Hands down. 

I have pinned a million pins (okay, ten) about meal planning. I have printed off cute templates to help me. I bought a dry erase board for my fridge. But the bottom line is that it's really hard to meal plan when your life has a scattered scedule. 
Here's a recipe for a Meal Planning Disaster:
  • Lack of cooking knowledge combine with
  • Lack of time and throw in
  • Actually eat dinner with husband 12 nights per month
  • Measure out LOTS of meal planning for one along with
  • Meal planning for lunch every single day  {you can only eat so much Chickfila, y'all}
So today we went to Costco and we bought a lot of food. I am bound-and-determined to make sure for the next TWO weeks, I don't have to buy lunch at the hospital OR be tempted to grab Krystal on my way up Signal. BTW, GREAAAAAT place for a Krystal. AH!

My Mom always told me that "participation takes preparation" -- same thing with meal planning. Make time to do it, and you are saving money (and calories) by not eating out. So this meal plan is more for lunches, not dinner. I would eat these things for dinner, but some people need a meat and two sides. When it's just me, a salad is a-ok.

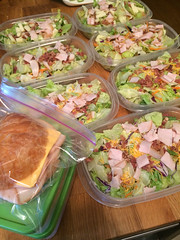
As soon as we got home form Costco, I made:
image

7 chef salads with cheese (buy the 3 lb bag of salad for $3.00, y'all!!), turkey and bacon bits with dressing on the side (in condiment cups), 3 turkey and cheese croissants (no mayo), 2 chicken salad sandwiches. 

I also bought HUGE bags of Skinny Pop, Snap Pea Crisps, and other snacks at Costco and put small servings in sandwich bags. Buying those teeny bags to throw in lunches may save you time, but it doesn't save you money usually ($ vs. oz).

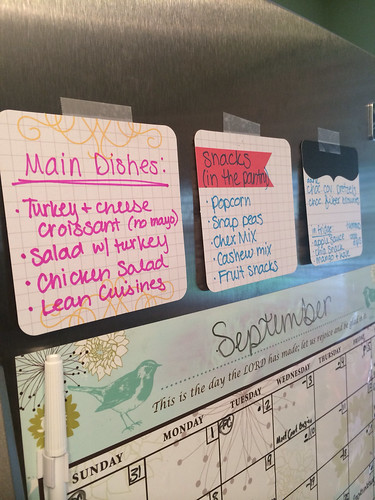
Then I made a list of everything I had made by category, and stuck it on the fridge so we would know what we had, and could mark it off when things were gone:
image

And the most crucial part of the "Grab and Go" method: ORGANIZE YOUR GRAB AREA.

I LOVE my panty with my fabulous Elfa system from The Container Store. I love those wheeled baskets so much I could hug them. I combined two half full baskets, moved some bigger snack items down to the big drawer on the bottom, and made TWO snack drawers with all of my snacks in them and labeled it, of course:
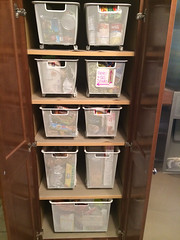
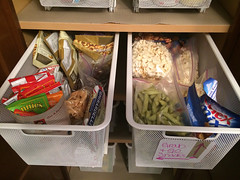
image    image

Now when Sam or I walk in the kitchen needing something to snack on, OR food to pack for lunch, we know what's already divided up and prepared and we can grab it and go. In case you are interested, here is the complete list of snacks (including snacks that are pre-packaged):

G&G Snacks: Pantry
Skinny Pop Popcorn
Dark Chocolate Covered Pretzels
Annie's Organic Fruit Snacks
Cashew Mix
Chex Mix
Cranberry Almond mix
Snap Pea Crisps

G&G Snacks: Fridge
Applesauce in squeezy pouches (organic)
Chia Seed squeezy pouches (taste like grape jello!)
Mango and Kale squeezy pouches (so good)
Fresh cut pineapple in rubbermaid boxes
Blue Crab Dip  (crackers in sandwich bag in pantry)
Hummus (carrots in bags OR crackers)

The "main entrees" include salads, turkey or chicken croissants (I only made four today and froze the rest of the pallet) or sandwiches, chicken salad, crab spread, pimento cheese, and when all of those run out, Lean Cuisines. ;)

Hope this helps those of you that struggle with meal planning like me! 

Sunday, March 24, 2013

She Cooks: Sorta Spicy Chicken Veggie Pasta

Sam and I are *trying* to eat healthier. I found this recipe originally on Pinterest and added a few things (chicken, zucchini), took out a few things (carrots), to make it an "original". We ate it last night and it was really good, not too spicy, and VERY filling. One plate was enough for Sam and we had enough leftovers for both of us.


Yield: Makes 4 large servings or 6 servings (a side would be needed - keep it healthy, don't pick bread)

Ingredients:
1 cup broccoli florets, chopped into small chunks
1/2 red pepper, diced
1 zucchini, diced
2 cups whole wheat pasta (I used penne)
2 boneless, skinless, chicken breasts, cooked (we grilled them)
1/4 cup olive oil
1 garlic clove, minced
3 Tbsp. all-purpose flour
1 1/2 cups milk
2 cups (8 oz package) Sargento Shredded Sharp Cheddar Cheese
1/2 tsp. crushed red pepper flakes
1/2 tsp. cayenne pepper
Salt and Pepper, to taste
2 Tbsp. breadcrumbs (optional)

Preheat over to 400 degrees. Set a medium pot of salted water to boil. Prepare a large baking sheet by lining with aluminum foil and coating with a little olive oil or non-stick cooking spray.

Toss broccoli, red pepper, and zucchini on baking sheet. Bake for 15 minutes, or until vegetables have softened. Remove from oven and set aside.

Once water is boiling, lower heat slightly and add pasta, cooking according to package directions. Drain and set aside.

Meanwhile, heat oil (slowly) in a large (deep) skillet over medium heat. Once hot, add garlic and cook 30 seconds. DON'T SCORCH YOUR GARLIC. Whisk in flour and cook one minute. Gradually whisk in milk, stirring constantly until mixture is slightly thickened. Remove from heat. Stir in cheddar cheese until well distributed and melted. Add red pepper flakes, cayenne pepper, salt and pepper. Add pasta, vegetables, and grilled chicken. Sprinkle breadcrumbs on top and serve.

Enjoy! :)


Wednesday, March 20, 2013

She Cooks: Homemade Sour Patch Grapes

I originally saw this on Pinterest and pinned it because Sam and I both LOVE Sour Patch Kids. But as well all know, they aren't the most healthy snack, so I was excited to try this recipe and try it out on Sam.

The verdict: He loved it and so did I! This is a great snack that is easy to prepare with quick clean up, and great to take for a summer event or to keep in your fridge as a healthy snack option.


Ingredients:
3 sandwich bags
1 package watermelon Jello
1 package lemon Jello
1 bag of green grapes

Open packages of Jello and pour half of watermelon Jello into one sandwich bag, half of the lemon into one sandwich bag, and then pour the remaining halves into one sandwich bag together.

Wash grapes and set on a paper towel. Pull grapes off stems and drop into sandwich bags. Seal bags and shake to coat the grapes.

Open bag and remove grapes - store in rubbermaid container in refrigerator for one hour (at least).

Then enjoy!


Monday, January 14, 2013

She Cooks: New Chicken Bacon Tortilla Soup (fast)

Sam and I LOVE the Crockin' Girl's Chicken Tortilla Soup. It is perfect for a cold day and tastes great! But sometimes, you can't wait five hours for a good soup so you improvise.

I made adjustments and additions to Jenna's original recipe and cooked it In a Lodge Dutch Oven we got for a wedding gift and it was great! Honestly I think it tasted better with the bacon in it. Bacon makes everything better! :) And it was quicker this way!

Chicken Bacon Tortilla Soup 
3 small chicken breasts
1 can diced tomatoes, drained (unless you want soupier soup - I like it thicker)
1 15oz. can tomato sauce
1 1/2 c chicken broth
1 can Campbell's Condensed Cheddar Cheese Soup
1/2 c milk (or water)
1 16oz bag frozen corn
1/2 tbsp chili powder
1/2 c bacon pieces or Real Bacon Bacon Bits  
Combine all ingredients (except chicken) in pot on low-medium heat and stir occassionally.  
Cook chicken on stove top in skillet until done (or put in GE Profile Convection oven for 17 minutes) 
Cut cooked chicken into 1 inch chunks and put in soup mixture 
Put lid on Dutch oven and increase temperature to just below medium for twenty minutes, stirring occassionally.  
Serve in bowls with avocado, shredded cheese and tortilla chips. 

Untitled

Tuesday, November 13, 2012

She Cooks: Bacon-Wrapped Green Beans

On Sunday we celebrated my Mom's birthday and fixed lunch. We served a crock pot ham with a brown sugar glaze and pineapple bits, garlic mashed potatoes and bacon-wrapped green beans.

The bacon-wrapped green beans were a hit. My Mom originally wasn't going to try them because she thought they were asparagus, but then she tried them and liked them. Sam LOVED them So much so that he has mentioned it THREE times at least how much he loves them and wants them again, and on Thanksgiving.

Ready to broil!

Untitled

I originally heard about these babies while listening to WayFM on the way to work. A mom had called in and said it was the only way she could get her son to eat vegetables. So I got online and found a recipe on Pinterest, but altered it a little because the salt overpowered the sauce. So here is my version:

1 pound fresh green beans
5-6 slices of bacon
2 tablespoons butter
1 tablespoon brown sugar
1 tablespoon garlic powder

1. Preheat oven to 400 degrees.
2. Wash and dry and snap the ends off of the green beans.
3. Grab a handful of beans (7-10) and lay them on a strip of bacon (this worked best for me lying the bacon on my hand, putting the stack of beans in the middle and rolling the bacon around it)
4. Place the bundle seam side down on a broiler pan and repeat until all the beans and bacon are gone
5. Melt the butter in a sauce pan on the stove. Add brown sugar and garlic powder and mix together until well combined.
6. Remove sauce from heat and using a basting brush, brush over the bacon and green beans.
7. Cover the pan of green bean bundles with aluminum foil and roast in the oven for 35 minutes.
8. Remove the foil and roast for another 10-15 minutes or until the bacon is nice and crisp.

Monday, September 3, 2012

She Cooks: Chocolate Dump Bundt Cake

The original recipe called it "Death by Chocolate" and Sam said to call it "Slap yo momma cake -- because it's so good it makes you wanna slap yo momma". I laughed typing that. No matter what you call it, it's darn good. And I copied the recipe right here for you.


Untitled

Mix together for 2 minutes (I used my pink KitchenAid Stand Mixer because EVERYTHING tastes better when you use a pink mixer):
  • 1 box of yellow cake mix
  • 1 box of vanilla instant pudding
  • 1 box of chocolate instant pudding
  • 4 eggs
  • 3/4 cup of oil
  • 1 cup of sour cream (all of an 8oz tub, I used lite sour cream)
  • half a 12 oz bag of semi sweet chocolate chips
Pour half the batter in a bunt pan

Then pour half of the remaining chocolate chips in (I made a layer of chocolate chunks between the two pours into the pan)

Pour in the rest of the batter and sprinkle on remaining chocolate chips. 

Bake at 350 degrees for 50 minutes exactly. I used a dark non-stick bunt pan (from my MIL, thanks Kim!) that was AWESOME and none of the cake stuck to it when I dropped it out. BUT I did let it cool for about 7 minutes before dropping it out.

It smelled wonderful and is super moist and fluffy and delicious. Sam said he would call it "surprising because the outside is chewy but the center is gooey -- it's quite a delicious contrast, if you will."

Yes, he said that. And I laughed at him. Bottom line: It's GOOD!

**A maybe tweak for next time - could drizzle a chocolate icing on top of it. Or caramel. 

Monday, May 14, 2012

Monogrammed Plates

Sam and I have a crazy busy life! Last Monday was our first days back to work, but it was a weird week since he had in-service training every day, so it wasn't "normal". Although I am not sure what normal will be still... but I digress.

Tonight we were able to come home from work and actually cook (he did) and eat together at the table for our first married meal that we cooked from scratch, at home(16 days after our wedding day).

Uploaded from the Photobucket iPhone App

We had cheddar bacon chicken (Kraft, freezer section - think Shake 'n Bake), green beans, and mashed potatoes. :) It was so good! And it was so good to spend time with each other tonight -- it's our only night together until Friday because I am going to Knoxville tomorrow-Thursday, then Thursday he has volunteer fire department.

Check out our AMAZING "every day china" -- we didn't eat off of it, but I just think it's really pretty. :) It's by Legado and only the salad plates are monogrammed. Which happen to be the only plates I bought. The dinner plates are really pretty, though, but very big.


ffa1d05a, Uploaded from the Photobucket iPhone App

And Zoe hung out on the couch like a good kitty. Or cat. She's huge now. And being good is a rarity for her these days.

Uploaded from the Photobucket iPhone App

She Cooks: Easy Chocolate Ganache Bites

For Mother's Day I made my Mother and Mother-in-Law two-layer chocolate cakes with strawberry filling between the layers, chocolate ganache icing and hand-dipped chocolate strawberries.

Okay, so it hit the side of the cake carrier on the way to my Mom's... but it was delicious!

Uploaded from the Photobucket iPhone App

Well, I had a TON of ganache leftover. So I used it to make these SUPER easy and SUPER yummy raspberry chocolate ganache bites:

RaspChocoBites

Here's how I did it:

1. Make Chocolate Ganache - recipe below
2. Scoop into a ziploc bag, close bag and cut off the bottom corner of the bag
3. Squeeze ganache into mini fillo (phyllo dough) shells - you can find these in the freezer section
4. Place washed raspberry into middle of ganache
5. Store in freezer until one hour before serving time

WARNING: They are sooo yummy. You can't eat just one.
Ganache Recipe  
hands-on time: 5 minutes        total time: 5 hours, 10 minutes 
1 pound semisweet chocolate, chopped (I used Nestle chocolate chips)
2 cups heavy cream
Pinch kosher salt 
1. Place chocolate in heatproof bowl 
2. In a medium saucepan, bring the cream to a bare simmer. **NOTE: by bare simmer, it means BARE SIMMER. Once you see baby bubbles, get it off the heat! It will scorch 
3. Pour bare simmering cream over chocolate, add salt, let stand for 2 minutes 
4. Whisk until the chocolate is melted and the mixture is smooth 
5. Let the frosting cool 4-5 hours, upon cooling, it will harden. 
....and don't you even think about sticking it in the fridge/freezer to speed this step up, it won't work ;) it will become lumpy